princess crochet
Showing all 2 resultsSorted by latest

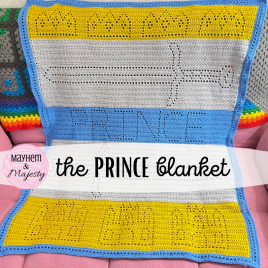
The Prince Blanket
Finally - the PRINCE blanket is ready to be crocheted along side the PRINCESS blanket. Want to personalize the lettering panel? THat's easy - just pick up my Lettering & Numbers Pattern Set to create a blanket that's personalized with a name and/or date.
- This pattern can be worked with any weight yarn and hook.
- Yarn amounts are for a blanket with a finished size of approximately 44x33 inches using DK yarn and a 4mm hook.
- This pattern can be increased/decreased by using different hooks sizes and yarn weights.

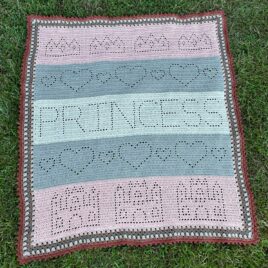
The Princess Blanket
Pattern Notes
- This pattern is worked from the bottom up and turned for each new row.
- Left-hand hook holders follow this pattern as written, noting that the ‘right side’ [RS] is actually the ‘wrong side’ [WS] for you. This means when you crochet even rows, you will be able to read the ‘princess.’ If you consult the graph, remember to read right to left on odd rows & left to right on even rows.
- This pattern can be made with any weight yarn & hook, but the finished size is approximately 33 by 36 inches (84 by 91 cm) using DK weight yarn and a 4.5mm hook. Using Worsted weight yarn the finished size is approximately 49 by 52 inches (125 by 132 cm).
- This pattern can be increased/decreased in size by changing your yarn weight and hook size.
- New to Mayhem & Majesty filet patterns? Please read the Help Guide on page 3 of this pattern before attempting to begin.
- Mayhem & Majesty pattern veteran? Please make sure to read the pattern in full as some techniques & stitch patterns may have changed since your last project.
Supplies - DK (#3/light worsted/8ply)
- Body: 1,425 yards total (that’s 285 yards DK yarn per panel)
- 150 yards DK yarn for border
- 4.5mm Hook
- Stitch Markers
Supplies - Worsted (#4/aran/10ply)
- Body: 1,900 yards total (that’s 380 yards per panel)
- Border: 200 yards
- 5.5mm Hook
- Stitch Markers
Stitch Abbreviations & Techniques ~ US Crochet Terms
- st(s) - stitch(es)
- sk - skip
- ch - chain
- slst - slip stitch
- sc - single crochet
- dc - double crochet
- GC - Granny Cluster: 3dc in same stitch
- GCD - Granny Cluster Decrease: dc in st, dc2tog starting in the same st as previous dc and ending in the next st, then make another dc into same st the dc2tog finished in - you should have a 3dc “granny cluster” that is spread over 2 sc sts. Video Tutorial
- CC - Corner Cluster: (3dc, ch1, 3dc) in same stitch
- picot - ch3, slst into 3rd ch from hook
- Optional Stitches/Techniques
- FDC - Foundation Row Double Crochet - Written + Video Tutorial
- Stacked DC - Photo Tutorial
- Standing DC - Photo or Video Tutorial
