
Mosaic Crochet
Showing all 13 resultsSorted by latest
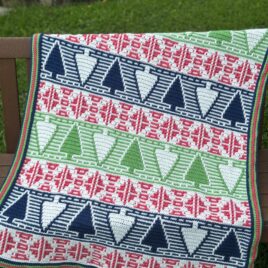
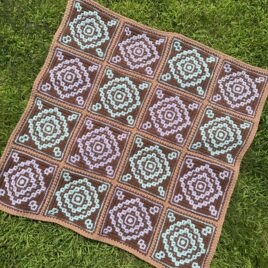
Mosaic Christmas
Throw Yarn Amounts - using Worsted Weight (#4 / Aran / 10ply) with a 5.5mm hook
53 inches wide by 64 inches tall (134.5 cm wide by 162.5 cm tall)
- I’ve shown the amounts broken down several ways so you are able to plan for whatever kind of color arrangement you desire. The Envelope Border amounts are the same no matter how many colors you use. I like to give the front and back border amount separately so you can stash-bust for the backside.
- If you’d like to use DK weight and a 4.5mm hook, you can decrease the yarn amounts below by 16% to create a throw that is a little smaller and lighter. Finished size for DK + 4.5mm hook is: 36 inches wide by 46 inches tall (91.5 cm wide by 117 cm tall).
3-Color Blanket - as shown on cover Yarn: I Love This Yarn by Hobby Lobby - WORSTED WEIGHT
- Ivory Metallic (background/main color): 1,859 yards (1,700 m)
- Berry Stonewashed: 840 yards (768 m)
- Dark Olive: 934 yards (854 m)
- Envelope Border Front & Close: 400 yards (366 m)
- Envelope Border Backside: 355 yards (325 m)
2-Color Blanket
- Main Color/Background: 1,859 yards (1,700 m)
- Accent Color: 1,774 yards (1,622 m)
Per Panel Breakdown
- Panel A Odd Rows (background): 158 yards (144 m)
- Panel A Even Rows: 140 yards (128 m)
—
- Panel B Odd Rows: 173 yards (158 m)
- Panel B Even Rows (background): 196 yards (179 m)
—
- Panel C Odd Rows: 196 yards (179 m)
- Panel C Even Rows (background): 173 yards (158 m)
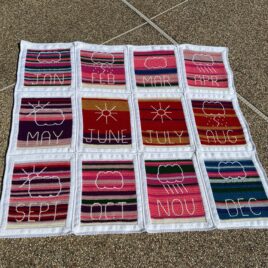
Mosaic Temperature Blanket – Mix & Match (72 block combos!)
DK Yarn (#3/light worsted/8 ply)
one block: 14 by 17 inches (36 by 43 cm)
Finished (3x4): 45 by 72 inches (114 by 183 cm)
Finished (4x3): 60 by 54 inches (153 by 137 cm)
- 4mm hook
- Filler (Design) Color (per month): 135 yards (123 meters)
- Temperature Color (per day): 2 grams / 6 yards / 5.5 meters
- Envelope Border (per block): all: 186 yards (170 meters) just the back: 88 yards (80 meters)
- Joining & Border: 400 yards (366 meters)
Worsted Yarn (#4/aran/10 ply)
one block: 17 by 22 inches (43 by 56 cm)
Finished (3x4): 57 by 94 inches (145 by 239 cm)
Finished (4x3): 74 by 71 inches (188 by 180 cm)
- 5mm hook
- Filler (Design) Color (per month): 162 yards (148 meters)
- Temperature Color (per day): 3 grams / 8 yards / 7 meters
- Envelope Border (per block): 223 yards (204 meters) just the back: 106 yards (96 meters)
- Joining & Border: 480 yards (439 meters)
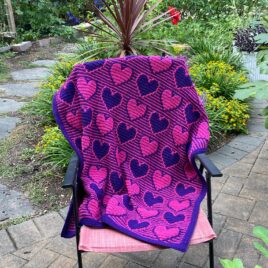
Scrappy Mosaic Hearts
Pattern Notes
- This pattern is worked row by row (no turning).
- Please refer to the stitch list on page 3 for meaning of stitch abbreviations used in the below bullet points and in the written/graph patterns.
- You’ll see that you are working a chain space after your first, and before your last, stitch (part of the BE and EE ). This is to set up the envelope border so you have no ends to sew in. The chain spaces will be what you stitch into as you border the sides of the blanket. The first & final sc (along with all the ends) will be enclosed in the envelope border.
- Excluding the BE and EE, all other sc are worked into the Back Loop Only (BLO).
- Beginner? I have tutorials for overlay mosaic here.
Baby Blanket Yarn Amounts - for Worsted Weight (#4/Aran/10ply)
Finished Size with yarn & Hook below: 32 by 42 inches (82 by 107 cm)
10% has been added to all yarn amounts to provide a cushion for looser stitchers. Hobby Lobby’s I Love This Yarn was used to gather yardages/sizing information. With my tension, I prefer to use the hook size n the label for my overlay mosaic projects, but you should use whatever you prefer if you have done overlay before - or maybe test a few swatches if this is your first time, to see what looks best.
- 5.5mm Hook
- Border Color + Envelope Border: 551 yards (504 m)
Work in only 2 colors
- Color 1: 630 yards (576 m) total0
- Color 2: 630 yards (576 m) total
Scrappy Colors
- Odd Row Color: 90 yards (82 m) per repeat of Rows 1-19
- Even Row Color: 90 yards (82 m) per repeat of Rows 1-19
~ Make a BIGGER Scrappy Blanket ~
7 Hearts wide: chain 163
Work the pattern changing the ( )x2 width repeat to an ( )x3 width repeat.
Yarn Amounts? 130 yards (119 m) per repeat of Rows 1-19
9 Hearts wide: chain 207
Work the pattern changing the ( )x2 width repeat to an ( )x4 width repeat.
Yarn Amounts? 170 yards (148 m) per repeat of Rows 1-19

Honeycomb Mosaic
Pattern Notes
- This pattern is worked row by row (no turning).
- If you haven’t already…please look over the stitch list on page 3 before continuing with these pattern notes or you may be confused.
- You’ll see that you are working a chain space after your first, and before your last, stitch (part of the BE and EE). This is to set up the envelope border so you have no ends to sew in. The chain spaces will be what you stitch into as you border the sides of the blanket. The first & final sc (along with all the ends) will be enclosed in the envelope border.
- Excluding the BE and EE, all other sc are worked into the BLO unless otherwise noted.
- Beginner? I have tutorials for overlay mosaic here.
Projects with Worsted Weight Yarn (#4 / aran / 10ply)
10% has been added to all yarn amounts to provide a cushion for looser stitchers. DK will take less than worsted, so if you prefer DK and a 4mm hook you can safely plan by the below numbers have have more than enough yarn!
- 5mm Hook
Baby Blanket - in 3 Colors - 34 by 38 inches (86 by 97 cm)
- Each of Color A, B, and C: 493 yards (450 m)
- Border Color + Envelope Border: 551 yards (504 m)
Throw Size Planning Notes - 3 colors
- Throw (3 colors; ch168+5): 248 yards (227 m) PER color PER height repeat (rows 4-45).
I want to use MORE colors!
A hexagon grid planning page for all 3 sizes below can be found on the final page of this document. With the below information you can plan a blanket that uses any number of colors (but you must use at least 3). You will begin a new color at the starting row of each NEW hexagon. You’ll want to consult the graph if you are unsure when this point is, as the pattern has written color changes for only 3 colors (or email me as I am happy to help you sort it out if it’s not clear). A “row of whole hexagons” means a vertical line of hexagons (for example the first row of whole hexagons is made by Rows 3-9).
- Baby Blanket: 83 yards (76 m) PER “row” of whole Hexagons.
- Throw: 125 yards (114 m) PER “row” of whole hexagons.
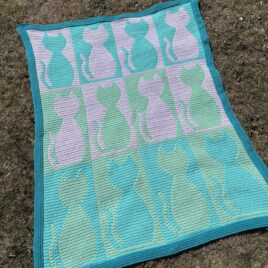
Mosaic Meow
Pattern Notes
- This pattern is worked row by row (no turning).
- Left handed hook holder? You can make this pattern as written with ONE SMALL CHANGE. When you see a diagonal ddc, you will make the opposite direction (written says “ddc-2L” then you would instead work a “ddc-2R.” This will make your blanket a mirror of the graph picture. You would still follow and consult the graph reading it right to left because that is how it will match the written instructions.
- If you haven’t already…please look over the stitch list on page 2 before continuing with these pattern notes or you may be confused.
- You’ll see that you are working a chain space after your first, and before your last, stitch (part of the BE and EE). This is to set up the envelope border so you have no ends to sew in. The chain spaces will be what you stitch into as you border the sides of the blanket. The first & final sc (along with all the ends) will be enclosed in the envelope border.
- IF YOU DO NOT PLAN TO DO AN ENVELOPE BORDER then you can omit the BE and EE and use whatever beginning and ending stitches you need for your preferred bordering method.
- Excluding the BE and EE, all other sc are worked into the BLO unless otherwise noted.
- This pattern comes with a graph, located on the final two pages and also a separate graph file for easy zooming on a screen or tablet, if needed.
- If you think you find an error, or are confused about anything - I am happy to help! The best way to reach me is ALWAYS by email: [email protected] I am usually able to reply to your email within 24 hours.
Yarn Needed for Mosaic Meow Throw (shown on cover)
- Finished size using a 5.5mm hook and Worsted Weight yarn is 48 x 60 inches (122 x 152 cm) without the envelope border (border as written with 4 rounds adds about 4 inches/10cm).
- Yarn amounts given below were taken using a 5.5mm (with a 10% cushion added).
- 3-Color Blanket: 1,312 yards (1,200 m) each of Color A, B, and C
- or 2-Color Blanket: 1,968 yards (1,800 m) each of Color A and B
- Front Border: 355 yards (324 m)
- Back Border: 355 yards (324 m)
- Closing Rnd: 50 yards (46 m)
Yarn needed for a Baby Blanket (3 cats wide by 2 tall)
- Size in worsted yarn would be 36 by 40 inches (92 by 102 cm) before adding the envelope border (border as written with 4 rounds adds about 4 inches/10cm).
- Yarn amounts: 984 yards (900 m) each of Color A and B. For the envelope border, you will need about 1/3 less yarn than the throw requires.
- You may prefer dk weight (and a smaller hook) to make the blanket a little lighter and smaller. For mosaic crochet, I like to use whatever hook my label suggests as this seems to be a good fit for my tension.
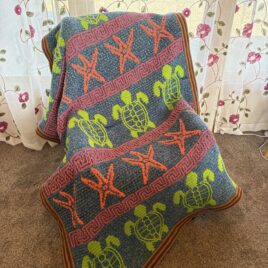
Seaside Holiday
Seaside Holiday
Pattern Notes
- This pattern is worked row by row (no turning). You change colors every row between the background color, which is always the odd rows, and the “design” color which will always be even rows.
- Graphs for this pattern are included in a separate file. All ends are encompasses in an envelope border, with no end sewing required (knots are used to begin and end each row) save for a couple for the border.
- Finished size on cover using a 5.5mm hook and worsted weight yarn is xx by xx inches (xxx by xxx cm). A smaller blanket can be made using DK yarn (#3 on the label - called light worsted, 8ply or DK) and a 4.5mm hook. Going by the worsted yarn amounts below, you will have more than enough yarn if you are using DK.
- Yarn amounts given below were taken using a 5.5mm and Hobby Lobby’s I Love This Yarn, which is a worsted weight yarn (with a 10% cushion). I Love this Yarn colors used for the blanket on the cover were: Sea Muse (10 balls, background color), Limelight (3 balls, turtles), Tropical Pink (2 balls, abstract), Mango (2 balls, starfish), and Toasted Almond (4 balls, border).
Background Color (odd rows): 2,512 yards (2,296 meters) total
Turtles: 1,031 yards (942 meters) total
Abstract: 384 yards (351 meters) total
Starfish: 496 yards (453 meters) total
Envelope Border (yarn amounts for 4 rounds)—
Front Border + Closing Round: 565 yards (517 meters)
Back Border: 556 yards (508 meters)
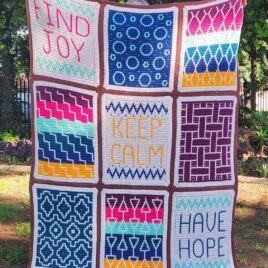
Keep Calm: 2025 Mosaic CAL eBook
- exclusive early access to the CAL!
- a lovely printable ebook of the CAL
- the original 9 blocks for the free CAL
- + 3 extra encouragement blocks:
- Live Free
- Show Love
- Give Life
- Mix and match all 12 blocks to create a unique blanket with your favorites – or use all 12!
- Graphs for each of the 12 blocks
- Joining instructions
- 2 Border Options
- no waiting – you get the entire project at once!
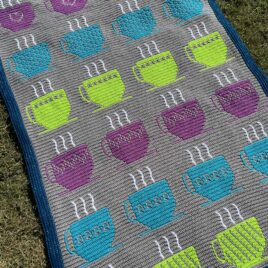
Tea Time Mosaic Blanket
Pattern Notes
- Finished size using a 5.5mm hook and worsted weight yarn is 48 by 72 inches (122 by 183 cm). This blanket is set up to be resizable, so you can easily make a smaller version by doing less panels of cups and/or fewer cup across the width. Or by using a lighter weight yarn and smaller hook.
- Yarn amounts given below were taken using a 5.5mm and Hobby Lobby’s I Love This Yarn, which is a worsted weight yarn (with a 10% cushion added).
- Yarn Per Panel -
-
- Background Color (odd rows): 361 yards (330 meters)
- Tea Cup Color (even rows): 225 yards (206 meters)
- Steam Color: 85 yards (78 meters)
- Yarn for the Envelope Border (4 rounds - do less or more as desired)—
- Front Border + Closing Round: 565 yards (517 meters)
- Back Border: 556 yards (508 meters)
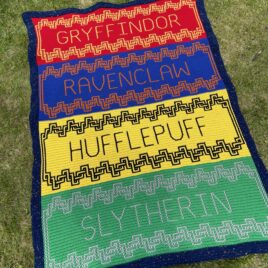
Hogwarts Houses: Overlay Mosaic Version
- This pattern is worked row by row (no turning).
- Envelope Border instructions included to deal with the ends!
- Finished size using a 5.5mm hook and worsted weight yarn is 48 by 72 inches (122 by 182 cm).
- Yarn amounts given below were taken using a 5.5mm and Hobby Lobby’s I Love This Yarn, which is a worsted weight yarn (with a 10% cushion added).
Diamonds Squared
- Mosaic Granny Squares Invisible Joins - my video (ad-free!) shows how to begin a mosaic granny square, how to join rounds with an invisible join while changing colors (and carry your yarn up), and how to finish a mosaic granny square with an invisible join.
- Just like in row-based overlay mosaic, you will be working all sc into the back loop only, unless otherwise instructed. All dropped dc (ddc) will be working into the front loop only.
- 5mm Hook
- 50 yards (46 m) for each color - 2 colors per square - Color A (the design) & Color B (the background)
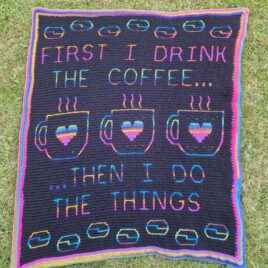
First Coffee Then Things
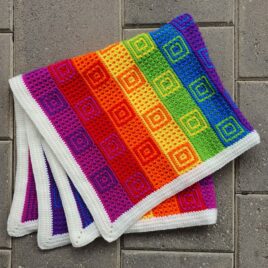
Hopscotch Blanket
- This pattern is worked row by row (no turning) and utilizes an Envelope Border to avoid sewing all those ends.
- Hopscotch is totally customizable in size and direction are included to do so.
- This pattern includes both written instructions and a graph.
- Coloring Options - Coloring is based on the odd & even rows. You use one color for odd rows and a second color for the even rows. You will begin using a new color for odd (or even) rows when you see “new color.” You will use the new color on all the odd (or even) rows until you hit the next color change command. In this way, you will be using each color for 11 rows (11 odd or 11 even rows, that is) making this a great stash buster because not much of each color will be needed!
- 4.5mm Hook
- A note on hook sizes + yarn weights - Paintbox Simply Aran is labeled as a #4 weight, just like Worsted. However, it is thinner than any US brand of #4 yarn I have used, so you may wish to use a different hook. Overlay Mosaic is a lot of sc stitches - if you crochet tightly, I recommend using the hook size on the label, maybe a size larger. If you tend to crochet loosely, you may want to use a size smaller than the yarn label recommends. If this is your first mosaic project, it would be wise to work up a swatch or two, to see what you like best. Directions for swatch size included.
- Each color change: 110 yards aran weight yarn
- Solid Color Border - 450 yards worsted weight yarn total
- Stitch Markers (to mark the width repeats, if desired)
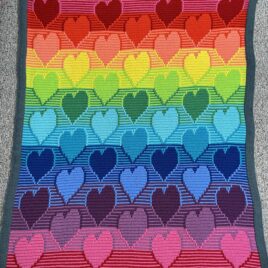
Love Always
- This pattern is worked row by row (no turning), and includes a written version for both right & left handed crocheters. Right hand hook is pages 7-10. Left hand hook is pages 11-14.
- The graph is included in a separate file. There is a one-page image file for use on devices, and there is also a printable version. It can be followed as written, no matter which hand you hold your hook in. Right-hand hook holders read the graph from right-to-left. Left-hand hook holders read the graph from left-to-right. It is colored to show how the color changes occur in the written pattern. As you read the graph, you need to be careful to read only the row you’re working - square by square - making the stitch indicated by the symbol on the square (or lack of symbol, as that means a sc).
- Your FIRST and LAST stitch of every row are worked into BOTH LOOPS. I start my first sc using a standing sc stitch - this is exactly like a stand dc, only you complete a sc stitch rather than a dc stitch (photo & video tutorials are links in the stitch list above).
- You’ll see that you are working a chain space after your first, and before your last, stitch. This is to set up the envelope border so you have no ends to sew in. The chain spaces will be what you stitch into as you border the sides of the blanket. The first & final sc (along with all the ends) will be enclosed in the envelope border.
- Excluding the first and last sc, all other sc are worked into the BLO.
- The stitches in ( ) are repeated. The design notes a repeat of ‘x3’ - which means you repeat the stitch sequence in the ( ) a total of three times. It may be helpful to place stitch markers to mark off the repeat sets. If you make the Baby size - your repeat will only be x2.
- About Colors. Each heart is outlined on top by the color of the heart in the proceeding row and outlined on the bottom by the color of the heart in the next row. There is a color planning example and color planning charts on pages 4-6.
- What about all those ENDS? There’s NO end sewing (except the final border round).
- Can the size of this blanket be customized? - Yes! You need to chain a multiple of 50 + 36 more. Then adjust the number of times you repeat the main width - the stitches inside the ( ) - to be the same as the multiple of 50 you chose.
- Never made an Overlay Mosaic project before? - No worries! I had a mix of both veteran and new to mosaic testers, so I hope you find this pattern is easy to follow - even if it is your first overlay mosaic project.
- 5.5mm Hook
- C1 & C2 - 340 yards worsted weight yarn per color
- C3-13 - 220 yards worsted weight yarn per color
- Solid Color Border - 740 yards worsted weight yarn total
- Front Border: 340 yards worsted weight yarn
- Back Border: 340 yards worsted weight yarn
- TIP! Have a yarn color you don’t care for? Use it for the back border.
- SC Closing Round: 60 yards worsted weight yarn
- Stitch Markers (to mark the repeats, if desired)