
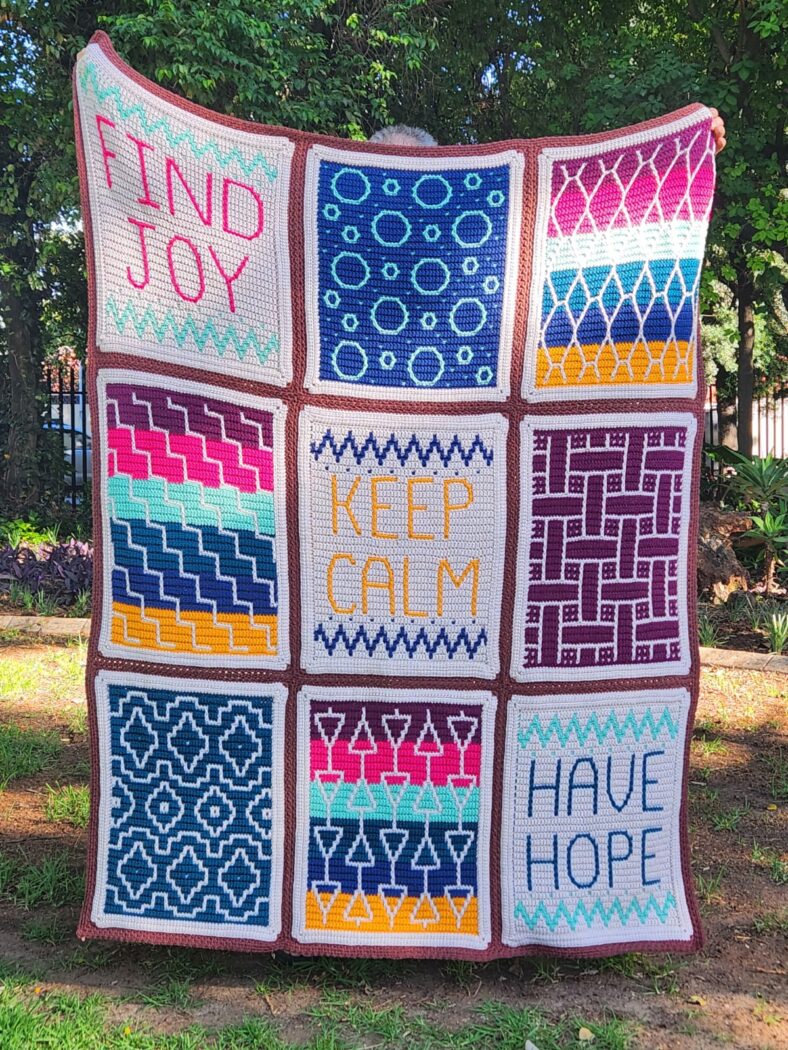
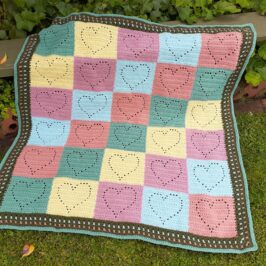
October marks the completion of this year’s Keep Calm crochet along! Below you will find the joining and bordering pattern.
Enjoy!
First, you NEED to read the supplies & info post to familiarize yourself with the following important pattern information:
- this year’s CAL options
- the supplies needed to create each month’s block
If you would like a printable version of the entire Mosaic version of the 2025 Keep Calm CAL (with graphs) in eBook form, you can use the code: rainbowsparkle for 20% off. Find the Mosaic version here.
Stitches & Terms – US Crochet Terms
- st(s) – stitch(es)
- ch(s) – chain(s)
- BLO – back loop only
- FL – front loop
- fp – front post
- BE – beginning edge = sc in both loops, ch1, sk next st
- EE – ending edge = ch1, sk nest st, sc in both loops of final st
- sc – single crochet
- dc – double crochet
- ddc – drop double crochet = dc made into the FL of the st 2 rows below
- -R = 2 rows below and 1 st to the right
- -2R = 2 rows below and 2 sts to the right
- -L = 2 rows below and 1 st to the left
- -2L = 2 rows below and 2 sts to the left
- fpddc – ddc made around the FP of the ddc below
- -R = below and 1 st to the right
- -2R = below and 2 sts to the right
- -L = below and 1 st to the left
- -2L = below and 2 sts to the left
- -2togR&L = below 1 st to the right & below 1 st to the left made as a dc2tog
Making the Blanket
Joining Your Blocks
Prefer a video? Watch here.
You will begin joining with the top right-hand square in the layout diagram, work your way to the left most square, and then work back along the bottom of the row. All following rows are also started on the right-hand side. Left handed crocheters will follow the diagram mirrored (begin in the left corner).
Stitch Pattern Abbreviations
Moss Stitch: (sc, ch1, sk 1 st) pattern repeated across the side.
JOIN: Ch1 around the corresponding ch1 space of the square indicated in pattern below. Do this by dropping the loop from your hook, insert hook front to back into the adjacent square’s corresponding ch1 sp, pick loop back up, ch1.
JOIN up/down/across the side/top: repeat this pattern *JOIN, sc* across the side of a square. This is just like working the Moss Stitch, but with the JOIN stitch replacing the normal ch1 to connect the current square with the previous square all along the side.
If you’re feeling confused, the video linked at the top of the page will really help clear it up so you can “see” the joining. It may be especially helpful for the place where four squares are joined.
Joining the First Row
- Join MC with a standing sc to corner sp of a FC square; Moss Stitch across side; (sc, ch2, sc) in corner sp, Moss Stitch across side; sc in corner sp; ch1
- sc in bottom right corner of next square to be joined (place a stitch marker in the ch1 space connecting the squares to locate it easily later), JOIN up the side; sc in corner ch2 sp, JOIN to adjacent corner, ch1, sc in corner sp of working square; Moss Stitch across side; (sc, ch2, sc) in 3rd corner; Moss Stitch across side; sc in corner sp; ch1.
Repeat Step 2 above until you reach the 4th (unworked) corner of the final square in Row 1. Continue with Step 3 below.
Completing a Row of Joined Blocks
- (sc, ch2, sc) in 4th corner of final square; { Moss Stitch across side; sc in 1st corner of current square, ch1, slst in ch1 sp between squares (this is where you should have placed a stitch marker) & pull slst tight, ch1, sc in corner of next square }; repeat between { } across the bottom of the row of squares to last squares corner; sc in corner of last square in row, ch1 & continue below.
Joining Remaining Rows
- sc in top right corner of next square to be joined (place a stitch marker in the ch1 space connecting the squares to locate it easily later), JOIN across the top; sc in corner sp, JOIN to adjacent square’s corner, ch1, sc in working square’s corner sp; Moss Stitch across side; sc in corner sp; ch1
- sc in corner of next square to be joined (place a stitch marker in the ch1 space connecting the squares to locate it easily later), JOIN up the side; sc in corner sp
- Where Four Squares Join: now you will join the corner of your working square to the corners of the other two squares surrounding it. Please note that you will not be joining the corner of this working square to the previous square with which you just joined up the side). Sc in corner of working square, JOIN to square diagonally across; JOIN to next adjacent square
- sc back in corner sp of working square; JOIN across the side; sc in corner sp, JOIN to adjacent square, ch1, Moss Stitch across side, sc in corner sp, ch1
Work Steps 4-7 until you reach the 3rd (unworked) corner of the final square in the Row. Sc in working squares corner sp, JOIN to adjacent square’s corner sp, ch1, sc in working square’s corner sp; Moss Stitch across side. Repeat Step 3 “Completing a Row of Joined Squares” above to complete the row.
Repeat Steps 4-7 until you have joined all the rows on your blanket. Finish the final unworked right-hand side of the blanket by using Step 3 “Completing a Row of Joined Squares” above. Finish off with a sc in very first corner of the joining, ch2, slst to first sc to join.
Pom-Pom Border
Bobble Stitch (dc5tog)-
- Yarn over (yo), insert hook into stitch and pull up a loop. YO, pull through two loops (this is like completing the first “half” of a dc).
- Repeat number one in the same stitch/space until you have a total of 6 loops on your hook – you will have made “half of a dc” 5 times.
- YO & pull through all 6 loops at once.
Rnd 1: Join border color in top right corner ch2 space; sc in same space as joining, *sc in next st and in each stitch across side; at the places where two adjacent corners are joined work (sc in the first corner, sc around join, sc in the next corner); (3sc) into corner ch2 space* repeat between * around blanket. Ch2 and join to first sc with a slst.
Rnd 2 (Bobble Pom-Pom): Ch1, turn (bobble poms look best from the front when crocheted with the backside facing); sc into corner st, *ch7, Bobble in 3rd ch from hook, slst in ch beneath Bobble, ch3, sk next 3 sts, sc in next* repeat between * around (treating the corner st as just another st – there is no special corner stitch pattern); join with a slst to first sc.


Leave a Reply